When the lights go out, a generator can be a true lifeline, powering everything from your refrigerator to your furnace. But simply plugging into an outlet isn't just inefficient—it's incredibly dangerous. Safely Connecting a Generator: Inlet Boxes & Transfer Switches isn't merely a convenience; it's a critical safety measure, a legal requirement, and the only way to seamlessly integrate backup power into your home's existing electrical system without risking lives or equipment. This guide will walk you through the why and how, ensuring your home stays powered when the grid goes dark, all while adhering to the highest safety standards.
At a Glance: Key Takeaways for Safe Generator Connection
- Mandatory Safety: A transfer switch is the only legal and safe way to connect a generator to your home's wiring. It prevents dangerous "back-feed" into the utility grid.
- Types of Switches: Choose between a Manual Transfer Switch (MTS) for portable generators, requiring human interaction, or an Automatic Transfer Switch (ATS) for standby generators, which operates autonomously.
- Proper Sizing: Match the transfer switch's amperage and capacity (whole-house vs. essential circuits) to your generator's output and your specific power needs.
- Permits Are Non-Negotiable: Always obtain necessary electrical permits from your local authorities before starting any work.
- Safety First (LOTO): Always follow Lockout/Tagout (LOTO) procedures when working inside your main electrical panel to prevent accidental re-energization.
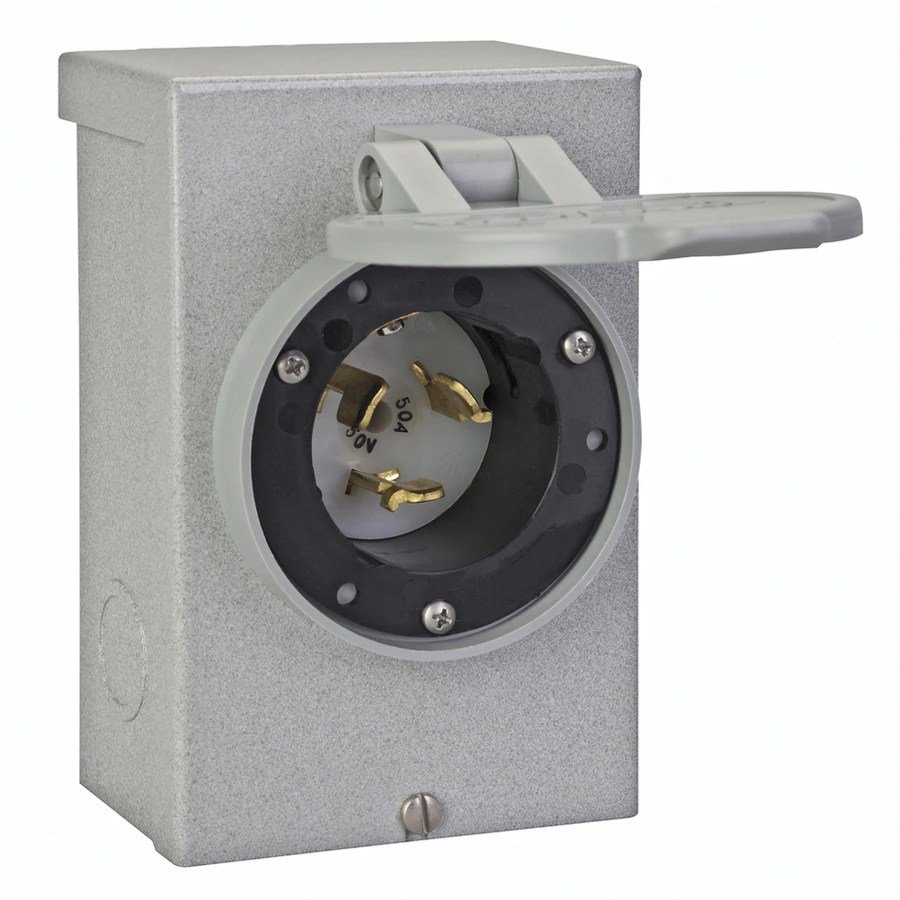
- Exterior Inlet Box: A weather-rated power inlet box is where your generator plugs in, providing a safe, dedicated connection point.
- Professional Help: If you're not confident with electrical work, hire a qualified electrician. This isn't a project to cut corners on.
Why a Generator Needs a Safe Connection: The Back-Feed Danger
Imagine a utility worker fixing a downed power line after a storm. They believe the line is dead, but unknowingly, a homeowner down the street has plugged their generator directly into an indoor outlet, sending power back onto the grid. This phenomenon, known as back-feed, is incredibly dangerous and often fatal. It's why connecting a generator through an extension cord directly to an indoor receptacle is strictly prohibited and illegal.
A generator transfer switch acts as an essential electrical isolator. Its primary job is to prevent utility power and generator power from ever being connected to your home's electrical system at the same time. This not only protects utility workers but also safeguards your generator and home appliances from severe damage when utility power is restored. Without a properly installed transfer switch, you simply cannot use your home's existing wiring to power appliances via a generator safely or legally.
Beyond the Extension Cord: Understanding Inlet Boxes and Transfer Switches
To truly harness your generator's power for your home, you need two key components working in tandem: a power inlet box and a transfer switch. These devices form the backbone of a secure and compliant backup power system.
The Power Inlet Box: Your Generator's Front Door
Think of the power inlet box as the dedicated "front door" for your generator's electricity. Mounted on the exterior of your home, this weather-rated receptacle is where you plug in your generator's power cord. It’s hardwired directly to your transfer switch inside, ensuring a sealed, secure, and permanent connection point that bypasses any internal household outlets. This setup keeps your generator safely outdoors, away from windows and doors, where carbon monoxide fumes can't become a hazard, while delivering its power indoors where it's needed.
The Transfer Switch: The Heart of Your Backup Power System
The transfer switch is the brains and brawn of your generator connection. Located near your main electrical panel, it's a specialized electrical device that allows you to safely switch your home's power source from the utility grid to your generator, and vice-versa. It's the lynchpin for safety and code compliance.
Manual vs. Automatic: Choosing Your Control Style
The type of transfer switch you choose largely depends on the kind of generator you have (portable vs. standby) and your preference for convenience during an outage.
- Manual Transfer Switches (MTS):
Commonly paired with portable generators, a manual transfer switch requires you to physically flip a switch to change power sources. When the utility power goes out, you'll go outside, start your generator, plug it into the inlet box, and then return to the MTS to manually switch selected circuits from utility power to generator power. - Pros: Generally more budget-friendly, reliable, and straightforward for DIY enthusiasts. Ideal for those who don't mind a hands-on approach during an outage.
- Cons: Requires manual intervention, meaning you'll need to be home and actively manage the power transition.
- Automatic Transfer Switches (ATS):
These are the gold standard for standby (fixed) generators. An ATS constantly monitors the utility lines. The moment it detects a power outage, it automatically starts your standby generator, waits for it to stabilize, and then seamlessly transfers your home's electrical load from the utility to the generator. When utility power returns, it reverses the process, shutting down the generator after a cool-down period. - Pros: Unparalleled convenience and peace of mind. No human intervention required, making them ideal for homes with occupants who might be away, elderly, or those simply desiring uninterrupted power.
- Cons: Significantly more expensive than MTS units and typically require professional installation. Standby generators cannot function without an ATS.
Sizing Up Your Switch: Amps, Watts, and Circuits
Selecting the correct transfer switch means ensuring it can handle the electrical load your generator produces and your home demands.
- Generator Output & Circuit Needs:
The transfer switch's amperage rating must match or exceed the output of your generator and the total amperage of the circuits you intend to power. - A 30-amp transfer switch is commonly used with portable generators producing 5,000 to 7,500 watts, providing sufficient capacity for essential circuits like your refrigerator, some lights, and a well pump. If you're running a portable generator that utilizes a standard 30-amp twist-lock plug, you'll want to understand all about 30 amp generator plugs to ensure compatibility and safe connection.
- For larger portable generators, typically up to 12,000 watts, a 50-amp transfer switch is often necessary to handle the increased power output.
- Whole-House vs. Essential Circuits:
Before selecting a switch, you need to decide what you want to power during an outage. - Essential Circuit Transfer Switch: Most homeowners opt for this. It powers a select number of critical circuits (e.g., refrigerator, freezer, furnace, well pump, crucial lights, internet router). This is often the most practical and cost-effective solution for portable generators, as it ensures vital functions remain operational without overwhelming the generator.
- Whole-House Transfer Switch: Designed to power your entire main electrical panel. While offering ultimate convenience, this option requires a powerful standby generator and a robust transfer switch, significantly increasing cost and complexity.
Service-Entrance Rated: Simplifying Installation (or Not)
Understanding the service-entrance rating is crucial for proper installation and code compliance.
- Service-Entrance Rated: A transfer switch labeled "service-entrance rated" includes the main electrical disconnect breaker. This allows it to be installed as the first piece of equipment after your utility meter, essentially acting as your home's main disconnect. This can simplify installation by consolidating components and potentially reducing the need for additional wiring within your main panel.
- Non-Service-Entrance Rated: These switches lack the main disconnect breaker. They must be installed downstream of your existing main electrical panel's disconnect. This means power flows from the utility meter, through your main panel's disconnect, and then to the transfer switch. While still safe and compliant, the wiring process can be slightly more involved as it requires tapping into your existing main panel's feed.
Before You Even Touch a Wire: Permits and Prudence
Connecting a generator involves significant electrical work that directly impacts your home's main power system. Skipping preliminary steps isn't just risky; it's foolish.
Navigating Local Regulations: The Permit Imperative
Electrical codes are not suggestions; they are laws designed for your safety and the safety of others. Before you purchase anything or even consider opening your electrical panel, contact your local building and electrical authorities.
- Obtain Necessary Permits: You will almost certainly need to obtain a permit for this type of electrical installation. This ensures that your work is inspected by qualified officials and meets the stringent requirements of the National Electrical Code (NEC) and any local ordinances.
- Consequences of Non-Compliance: Failing to secure permits can lead to failed inspections, difficulty selling your home, voided insurance policies in case of an electrical incident, and most importantly, dangerous and potentially life-threatening installations. Don't cut corners here.
The Golden Rule of Electrical Work: Lockout/Tagout (LOTO)
Working inside your main electrical panel is inherently dangerous. Electricity at this level can be lethal. The Lockout/Tagout (LOTO) procedure is a non-negotiable safety protocol.
- Turn Off the Main Breaker: Locate your home's main utility breaker in your main electrical panel and turn it to the "OFF" position. This de-energizes the entire panel.
- Apply a Mechanical Lockout Device: Use a specialized lockout device on the main breaker. This physical barrier prevents anyone from accidentally turning the breaker back on while you're working.
- Affix a Tag: Attach a clear tag to the lockout device. This tag should identify you as the worker and briefly state the reason for the lockout (e.g., "Working on Generator Transfer Switch - DO NOT ENERGIZE").
- Verify De-Energization: This step is critical. Use a non-contact voltage tester (or a contact voltmeter if you're experienced) to verify that the main bus bars and all associated wiring within the main electrical panel are entirely de-energized. NEVER assume power is off just because you flipped a switch. Test every wire you plan to touch.
Arming Your Toolbox: Essential Tools and Materials
Having the right tools and materials on hand will make the installation process smoother and safer.
- Insulated Screwdrivers: Essential for electrical work, providing an extra layer of protection.
- Lineman’s Pliers & Wire Stripper: For cutting, gripping, and stripping wires.
- Drill & Knockout Punch Kit: To create precise openings in electrical panels and enclosures for conduit.
- The Transfer Switch Kit: Your chosen manual or automatic transfer switch, complete with all its components and instructions.
- Appropriate-Gauge Wiring: This is crucial. Typically, you'll need 10 AWG wire for 30-amp circuits and 6 AWG wire for 50-amp circuits, but always refer to your generator and transfer switch's specifications and local code. All wiring must be rated for 120/240 volts.
- Conduit: Such as flexible metal conduit (FMC) or electrical metallic tubing (EMT), along with appropriate fittings and connectors, to protect the wiring runs between the transfer switch, inlet box, and main panel.
- Wire Nuts: For splicing wires securely.
- Multimeter/Voltmeter: For testing voltage before, during, and after installation.
- Safety Glasses and Gloves: Always protect your eyes and hands.
Step-by-Step Installation: From Mount to Main Panel
This section outlines the general steps for installing a manual transfer switch and power inlet box. While specific details may vary based on your particular model and local codes, the core sequence remains consistent. If you are not comfortable performing electrical work, or if local codes require it, please hire a licensed electrician.
Finding the Right Spot: Mounting the Transfer Switch
The physical placement of your transfer switch is important for ease of installation and future operation.
- Proximity to Main Panel: Mount the transfer switch enclosure on a wall surface approximately 18 to 24 inches from your main electrical panel. This minimizes the length of conduit and wiring runs, simplifying the process and reducing potential voltage drop.
- Secure Fastening: Use appropriate mounting hardware (screws, anchors) to securely fasten the transfer switch enclosure to wall studs or blocking. Ensure it's level and firmly attached.
Making the Connections: Wiring Your System
This is where your meticulous planning and adherence to LOTO procedures come into play. Remember, the main panel should be de-energized.
- Knockouts and Conduit Runs:
- Using a knockout punch, create openings in both the transfer switch and the main electrical panel enclosures where your conduit will enter.
- Install appropriate conduit connectors and run the conduit between the transfer switch and the main panel, and from the transfer switch to the location of your exterior power inlet box.
- Connecting the Power Inlet Box:
- Run the appropriately sized generator inlet wiring (e.g., 10 AWG for 30-amp, 6 AWG for 50-amp) through the conduit, from the transfer switch's generator input terminals, through the wall, to your chosen exterior location for the weather-rated power inlet box.
- Connect these wires to the terminals inside the power inlet box. Ensure all connections are tight and secure.
- Grounding and Neutralizing:
- Inside the main service panel, locate the neutral bus bar (typically white wires) and the ground bus bar (typically bare copper or green wires).
- Connect the neutral wire from the transfer switch to the neutral bus bar.
- Connect the ground wire from the transfer switch to the ground bus bar. These connections are fundamental for safety and proper system operation.
- Integrating Your Home's Circuits (Load Wires):
This is the most intricate part for an essential circuit transfer switch. You're rerouting specific circuits from your main panel through the transfer switch.
- For Each Selected Circuit:
- Identify and Disconnect: Carefully identify the existing circuit breaker in your main panel that controls the essential circuit you want to power (e.g., kitchen refrigerator). Turn off this individual breaker (it should already be off if you followed LOTO, but double-check). Remove the existing circuit wire (the "load" wire) from its terminal on this breaker.
- Splice to Transfer Switch: Take the removed existing circuit wire (which leads to the appliance/load) and splice it together with a corresponding black "load" wire from the transfer switch using a wire nut. This establishes the generator's path to your appliance.
- Connect Transfer Switch to Breaker: Now, take the red "utility" wire from the transfer switch (which corresponds to the circuit you just modified) and connect it to the terminal of the circuit breaker from which you originally removed the load wire. This ensures the breaker still protects the circuit when power comes from either source.
- Repeat for all essential circuits.
- Bringing in the Big Guns: Utility and Generator Feeds:
- Main Utility Power Feed: Connect the main utility power feed wires (typically two hot wires, black and red, and a neutral) from the main panel to the designated "Utility" terminals within the transfer switch. These wires will carry the power from the grid to the switch.
- Generator Power Feed: Connect the wires coming from your exterior generator inlet box to the "Generator" terminals inside the transfer switch. These wires will bring the generator's power to the switch.
- Final Enclosure:
- Once all wiring is complete and double-checked for tightness and correct connections, carefully reinstall the covers on both the main electrical panel and the transfer switch. This protects the wiring and prevents accidental contact.
Beyond the Basics: Portable Generator Components & Flexibility
While the focus has been on the transfer switch as a core safety device, portable generators often involve additional components to maximize their utility and flexibility.
Manual Transfer Switches: Direct Control for Portable Power
As discussed, an MTS is your direct interface for a portable generator. It allows you to select specific circuits in your home to be powered. The key here is pre-determined circuits. During installation, you decide which circuits (e.g., furnace, refrigerator, some lights) will be connected to the transfer switch. This pre-selection ensures that you don't accidentally try to power too many appliances, overloading your portable generator. It's the essential link for hardwired systems that cannot simply be plugged into an extension cord.
The Generator Power Cord: Sizing it Right
The power cord connecting your portable generator to the exterior power inlet box is more than just a cable; it's a critical component.
- Amperage Match: The cord's amperage rating must match the largest outlet on your generator and be compatible with your power inlet box and transfer switch. Using an undersized cord can lead to overheating, voltage drop, and fire hazards.
- Length: Choose a cord long enough to position your generator safely outdoors, away from your home's openings, but not excessively long, as this can increase voltage drop.
Transfer Panels: More Flexibility for Your Portable Setup
While a traditional manual transfer switch typically powers a fixed set of essential circuits, a transfer panel offers a different approach, especially useful if your needs vary during different outages.
- Whole Breaker Panel Connection: Unlike a standard MTS that taps into specific circuits, a transfer panel often connects to your entire breaker panel through a sub-panel arrangement. This gives you greater flexibility, allowing you to choose which circuits to power at any given time, as long as you stay within your generator's capacity.
- Power Inlet Box Requirement: Like other generator connection systems, transfer panels also require an exterior power inlet box for a safe, dedicated generator connection point.
Flipping the Switch: Testing Your New System
After installation, thoroughly testing your new transfer switch and inlet box setup is paramount. Do not rush this step.
Utility Power Test: Confirming Continuity
- Restore Utility Power: With all panel covers securely in place and your transfer switch circuit breakers in the "OFF" position, restore utility power by flipping your main utility breaker back to the "ON" position.
- Verify Utility Connection: Use a voltmeter to confirm a 240-volt reading (and 120 volts on each hot leg to neutral) at the "Utility" side terminals within the transfer switch (if safely accessible or via the transfer switch's meter, if equipped).
- Circuit Function Check: For each circuit connected to the transfer switch, manually switch its selector from "OFF" to "LINE" (utility). Verify that the connected appliance or light functions correctly. Then switch it back to "OFF." This confirms that utility power is flowing correctly through the transfer switch to your home's circuits.
Generator Power Test: Bringing Backup Online Safely
Now, it's time to see your generator in action with the new system.
- Generator Placement: Move your portable generator outdoors, ensuring it's in a well-ventilated area, away from any doors, windows, or vents to prevent carbon monoxide buildup inside your home.
- Start Generator: Start your generator according to the manufacturer's instructions and allow it to warm up and stabilize for a few minutes.
- Plug In: With utility power still connected (critical for this test to ensure the transfer switch operates as an isolator), plug your generator's power cord into the exterior power inlet box.
- Verify Generator Output: Use a voltmeter to confirm your generator's output voltage (typically 240 volts) at the "Generator" side terminals within the transfer switch.
- Transfer Individual Circuits: With the main transfer switch mechanism still in the "LINE" position, move individual circuit switches from "LINE" to "GENERATOR." Verify that the connected appliances now run on generator power. Observe your generator's load meter to ensure you're not exceeding its capacity.
- Switch Back: Once verified, switch each circuit back to "LINE" and unplug the generator.
Living with Backup Power: Safe Operation During Outages
Knowing how to operate your generator safely and efficiently during an actual power outage is just as important as the installation.
During a Power Outage: The Startup Sequence
When the utility power goes out:
- Turn Off Transfer Switch Breakers: Go to your transfer switch and turn off all individual circuit breakers connected within it. This minimizes the initial load on the generator.
- Generator Placement & Startup: Move your portable generator outside to its safe operating location. Start the generator and allow it to run for 1-2 minutes to warm up and stabilize.
- Connect Generator: Plug the generator's power cord into your exterior power inlet box.
- Transfer Power: Go to your transfer switch and flip the main transfer switch mechanism from "LINE" to the "GENERATOR" position.
- Turn On Circuits Selectively: Now, one by one, turn on the individual circuit breakers within the transfer switch. Start with your most critical appliances (e.g., refrigerator, furnace). Be mindful of your generator's wattage capacity; do not try to power everything at once if your generator can't handle it. Monitor the generator's load meter if available.
When Power Returns: The Shutdown Sequence
When utility power is restored:
- Turn Off Transfer Switch Breakers: Go to your transfer switch and turn off all individual circuit breakers that are currently running on generator power.
- Transfer Back to Utility: Flip the main transfer switch mechanism back to the "LINE" (utility) position.
- Generator Cool-down: Allow the generator to run for a brief cool-down period (a few minutes) with no load on it. This helps extend its lifespan.
- Shut Off Generator: Turn off your generator and unplug the power cord from the inlet box. Store the cord safely.
Common Questions & Misconceptions
Let's clear up some frequent queries about generator connections.
Q: Can I just use an extension cord from my generator to an outlet in my house?
A: Absolutely not. This is incredibly dangerous and illegal. It creates a direct path for "back-feed" electricity onto the utility grid, posing a lethal threat to utility workers. It can also damage your home's wiring and appliances. A transfer switch is the only safe and legal method.
Q: Is a transfer switch really necessary? My neighbor just runs a few extension cords directly into his house.
A: Yes, a transfer switch is mandatory for safety and code compliance if you want to power your home's hardwired circuits (like a furnace or well pump) or use its internal wiring. Your neighbor's method, while common, is dangerous. An extension cord only provides power to the specific appliance it's connected to, never the house's built-in circuits, and should never enter the home through windows or doors where it could pinch and damage the cord or allow carbon monoxide to enter.
Q: What if I'm not confident doing the wiring myself?
A: If you have any doubts about your ability to safely and correctly install a transfer switch, stop. This is a job for a qualified, licensed electrician. The cost of professional installation is a small price to pay for your safety and peace of mind.
Q: How often should I test my generator and transfer switch system?
A: It's highly recommended to test your generator and transfer switch monthly or at least quarterly. Start your generator, let it run for 15-20 minutes, and test a few circuits through the transfer switch. This ensures your generator starts reliably and your entire system is ready when an actual outage occurs.
The Takeaway: Power Up, Safely and Smartly
Connecting a generator to your home with an inlet box and transfer switch isn't just about convenience during an outage; it's fundamentally about safety, legal compliance, and protecting your investment. While the installation process involves careful electrical work, understanding the components, following strict safety protocols like Lockout/Tagout, and adhering to local codes will empower you to provide reliable backup power for your home.
Whether you opt for a manual system for your portable generator or a fully automatic setup for a standby unit, taking the time to set it up correctly means you'll be ready when the next storm hits. If in doubt, always consult with a licensed electrician. Don't let a power outage leave you in the dark, or worse, put lives at risk. Be prepared, be safe, and power up smartly.